Most of us can agree on the importance of warming up our bodies before we start exercising. Without a proper warm-up, our muscles may be stiff and be more susceptible to injury. Stiff muscles = more risk of pulling and straining = more chance of injury. Warmer muscles are more flexible and pliable, which helps our bodies to absorb impact and move to its full range of motion.

You want less of this....
The concept of muscle stretching and flexibility has gained even more attention in recent years. Tom Brady (the quarterback for the New England Patriots) is one of the oldest quarterbacks in NFL history, and he has said that muscle pliability has been the key to staying healthy and injury-free (https://www.youtube.com/watch?v=WHJvhcqNSqw).
I know the vast majority of you reading my blog are not professional athletes...but you are professional voice users - someone who relies on their voice to be successful at their job. And as a professional voice user, you should think of your voice as a muscle that requires the same treatment as any other muscle group before it is used. Your voice needs to be properly warmed up and stretched in order to function properly and reduce the risk of injury.

....And more of this!
But how do you warm up your voice? Well, before I get to the exercises It may be helpful for you to have a little background on how voice and speech are produced.
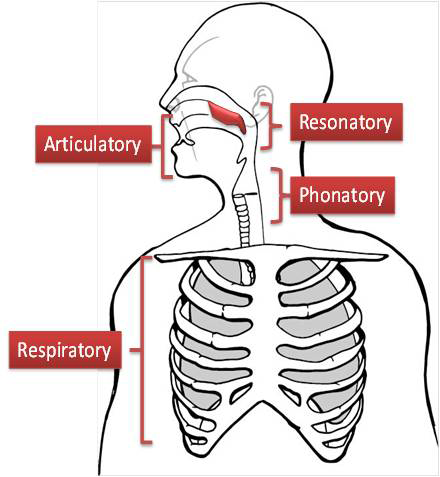
How We Make our Voices
There are four main systems involved in producing voice and speech:
-
The respiratory system (the driving force of the voice - the lungs)
-
The phonatory system (the sound source of the voice - the vocal cords)
-
The resonatory system (the open spaces that filter the sound - your throat, nose, and mouth)
-
And the articulatory system (the way we shape the voice into speech - our lips, tongue, and jaw)
These systems are powered by lots of muscles, cartilages, and bones that work together like a well-oiled machine to produce intelligible speech and voice.
To keep these systems efficient and functioning properly, complete the following exercises every morning or before you start talking.
Vocal Warm-Ups (Click here for a free, printable PDF of the warm-ups!)
** As a disclaimer - you know your body better than I do. Please monitor the way your body feels. If you have pain or any health limitations that impact your ability to complete these stretches and exercises safely, please do not do them. None of these stretches or exercises should hurt or be painful, so if you feel pain - stop!**
1) Upper Body and Face Stretch
It’s important to release any tension you have in your face, neck, shoulders, and back. Tension in these muscle groups may also lead to tension in the deeper muscles of your throat and face.
-
Stand up tall. Roll your shoulders backwards in small circles 10 times. Now switch directions and roll your shoulders forwards in small circles 10 times.
-
Gently drop your head down and roll your head side to side 10 times
-
Smile wide, stretching your face and cheeks outward. Then bring your lips together in an “o” shape (like you’re saying the vowel “oooo”). Alternate the smile and “o” shape 10 times.
-
Open your mouth wide, like you’re saying “ahh”, to stretch out your lips and jaw 10 times.
-
Get your lips moving by completing a lip trill with just airflow (no voicing). Do for 3 breaths.
-
Now get your tongue moving by completing a tongue trill with just airflow (no voicing). Do 3 breaths.
2) Respiratory System
The breath is the power source of voicing - without good airflow, you won’t have a good voice. Try the following exercise to warm up the muscles of respiration.This exercise works best if you are standing in front of a mirror.
-
Stand up tall. Roll your shoulders up, back, and then down, and lift your chest upward. Imagine there are strings pulling from the top of your head and your chest, lifting up towards the ceiling. Your chin should be neutral with the ground.
-
Take a deep breath in through your nose, concentrating on filling up your lungs from the bottom of your lungs to the top.
-
Watch your shoulders as you breathe in - your shoulders should not move.
-
You should see the movement in your ribcage and stomach - your ribcage should go out and up, and your stomach should pop out.
-
Inhale through your nose, and exhale through your mouth on the “s” sound: “ssssssssssss”. Do this 3 times.
-
Now when you exhale, increase the volume of the airflow from soft to loud: “sssssSSSSSSSSSS”. Use your stomach muscles to control the airflow. Do this 3 times.
-
Now go from soft to loud to soft on one exhalation: “sssssSSSSSSssssss”. You should feel your stomach muscles contracting as you do this. Do this 3 times.
3) Phonatory System: Sustained Pitch
Once your rib cage and stomach muscles feel warmed up and you have established good airflow, it’s time to warm up your vocal cords.
-
Stand up tall. Take a deep breath in, and yawn when you exhale. It should be an easy, light yawn, and your throat should feel open and relaxed.
-
Now say the vowel “ah” on a comfortable pitch and sustain this note. Stop before you run out of air. Do 3 times.
-
Switch the vowel sound to “ooo” on a comfortable pitch and sustain this note, but stop before you run out of air. Do 3 times.
-
Switch the vowel sound to “eee” on that same comfortable pitch, and stop before you run out of air. Do 3 times.
-
Now say all three vowel sounds in one breath at the same comfortable pitch: “ahh - ooo - eee - ahh - ooo - eee”. Stop before you run out of air.
4) Phonatory System: Pitch Glide
Once your vocal cords feel warmed up, let’s stretch out the inner throat muscles with pitch glides.
-
Stand up tall. Say the vowel “ah”, starting at a comfortable pitch. Glide up a scale to the highest pitch that feels comfortable (no straining!). Hold the high pitch for as long as you can, but stop before you run out of air.
-
Now say the vowel “ah”, starting on your highest comfortable pitch and glide down a scale to your lowest comfortable pitch (no straining!). Hold the low pitch for as long as you can, but stop before you run out of air.
-
Now glide up and down the scale, starting at your lowest pitch and up to your highest pitch and back down, in one breath. Make sure you don’t strain at the low or high ends of your range.
-
You can also use the vowels “ooo” and “eee” to complete this exercise.
5) Resonatory System: Humming
You want a voice that sounds effortless and easy - not one that is strained or harsh.
This exercise will help your voice resonate within the open spaces in your mouth and nose, which will give your voice a smooth and relaxed quality.
-
Stand up tall. Take a breath in and exhale on a hum at a comfortable pitch: “hmmmmmmmm”.
-
Place your fingers along the sides of your nose and lips while you’re humming - you should feel a buzzy vibration.
-
The hum should be easy and effortless, and it may even feel soothing to your vocal cords.
-
If you have a difficult time starting the hum, pretend you are answering a question in agreement and say, “Mmm-hmmm”. Now hold out the “hmmm” portion.
-
Once you feel a nice, buzzy sensation along your nose and lips, you can glide up and down a scale on the hum going from low to high and high to low.
-
Do 5 times.
6) Articulatory System: Face, Lips, and Tongue
Now that you’ve warmed up the respiratory muscles, the phonatory muscles, and the resonance system, it’s time to warm up the last group of muscles involved in speaking: your face, lips, and tongue.
-
Stand up tall. Take a breath in and say the following: “May...Me..My...Mow...Moo”. Try to connect the words together by saying them in one breath, and stretch out the “mmm” sounds. “Mmmmaaayyymmmmmeeeeemmmmmyyyyyymmmmmoooowwwwmmmoooo”.
-
Exaggerate your facial movements as you articulate the words - open your mouth wide as you say each sound.
-
Now say the following words in the same pattern as above:
-
“Lay...Lee...Lie...Low...Lou”
-
“Bay...Be...By...Bow...Boo”
-
“Tay...Tea...Tie...Toe...Too”
-
“Kay...Key...Kye...Koe...Koo”
-
Now challenge your articulators with the following tongue twisters:
-
“Red leather, yellow leather”
-
“Unique New York”
-
“She sells seashells by the seashore”
-
“Buttercup, buttercup, buttercup”
Thanks for reading! And I'd love to hear from you - contact me to learn how we can work together to perfect your American English pronunciation!